A new antenna testing method from researchers at the Physical Measurement Laboratory (PML) in Colorado could lead to greater accuracy in the characterization and calibration of antennas for use at 50 GHz to 500 GHz.
Currently, “there are no international reference standards for antennas at these frequencies,” team member David Novotny of the Radio-Frequency Fields Group in PML’s Electromagnetics Division said. “So there is no way to compare and validate measurements at different facilities. We hope to be able to measure probe antennas that are then used by others to characterize systems to a common baseline.”
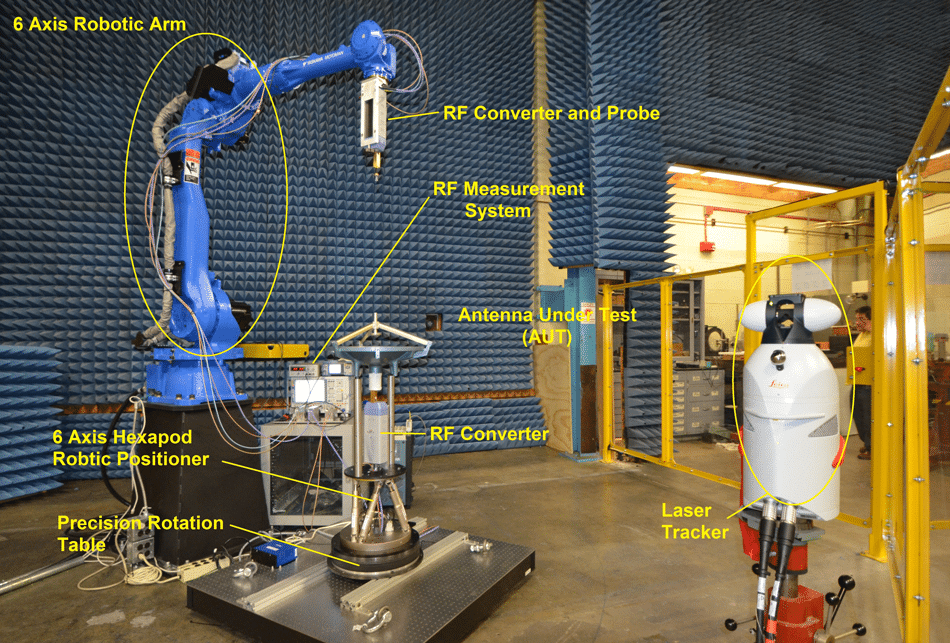
The new system, which combines a precision three-meter industrial robot arm with a metrology-grade laser tracker and other apparatus, can measure a moving probe antenna’s position to within 50 micrometers. The research team believes the new system will enhance antenna measurement capabilities by allowing for greater freedom in antenna positioning during testing.
Most measurements are taken using a planar system, say the researchers, in which the scanning stages for the probe antenna that sends/receives the signal are mounted on granite slabs for stability and then scanned in front of the antenna under test (AUT). This system limits scan angles to 35 degrees and can hinder the collection of information regarding the AUT. Though more complete characterization can be achieved using a spherical scan that measures the AUT’s performance from many different angles, realigning the AUT and probe is expensive and time-consuming.
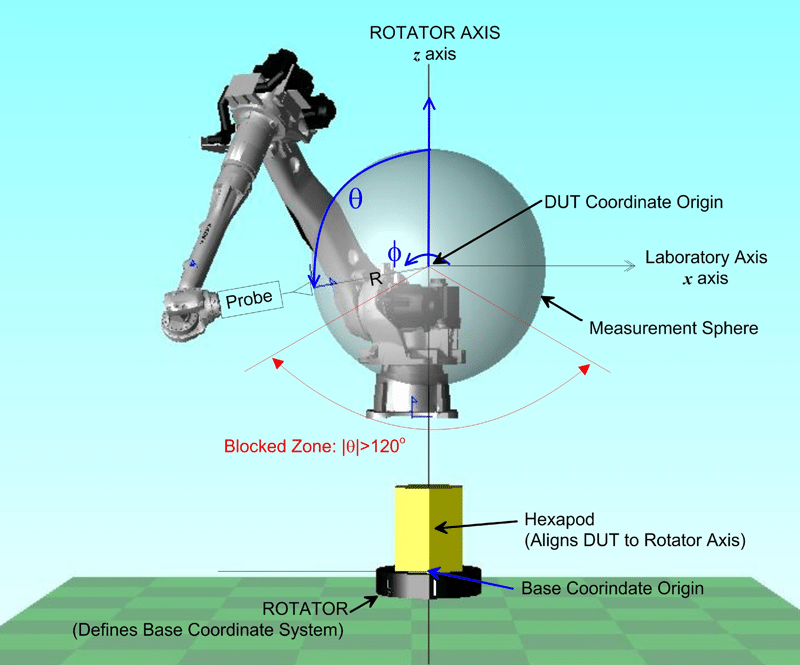
 In contrast, the new system developed by scientists at PML’s Antenna Metrology Lab in Boulder, Colo. “offers 12 degrees of freedom in movement and alignment—six from the industrial robot arm for the probe antenna, and six for aligning the AUT to the robotic stages.” Laser beams reflecting off targets on the apparatus are used to track the probe’s position as it moves continuously in arc of up to 240 degrees around the AUT. The AUT is rotated slightly and the process is repeated until a spherical image is generated.
According to team member Joshua Gordon, a major advantage of the new system is its ability to measure while the probe antenna is in constant motion.
“It’s a dynamic measurement,” Gordon said. “If you were to start and stop the arm for each measurement, it would shake the structure and it would take a lot of time for that vibration to dissipate. We avoid that problem, and we’ve been able to get high repeatability and to position the probe to within 50 micrometers, and track the probe within 25 micrometers.”
The system is still being fine-tuned, says team member Jason Coder, adding that at 500 GHz, it will be necessary “to know the probe position to within 15 to 20 micrometers and to ensure that the probe is normal to the scan surface within 0.05 degrees.” In addition, a complete characterization “will require knowledge of the exact relative distance between the antennas as well as the relative alignment of their apertures.” Ultimately, the team hopes to use the new system to calibrate antennas used in satellite Earth-observation measurements and test telecommunications equipment at higher frequencies.
